Adding a New Client
OVERVIEW:
The client information screen is where you add new clients to DELPHI32. This screen contains the demographic, medical, insurance, accounting, and other background information associated with each client entered into DELPHI32.
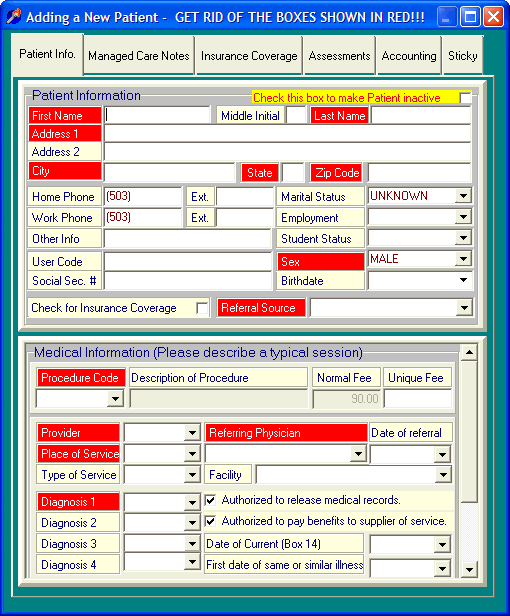
When adding a new client, DELPHI32 requires that a minimum of information be completed before you are allowed to use the billing features of the software. The required information appears visually in red to make it obvious to you what is needed. These instructions only cover the "required" information. Those items not highlighted in red are not required and are covered in detail in the section labeled Client Information Screen.
For reference, the client information screen consists of the following sections:
Client Information Screen (Demographic data)
Remember, these instructions are meant to cover only that information which is required by DELPHI32 in order to use the billing features of the software.
*Note: You may choose between the terms "Client" or "Patient" if prefer one term over another. This document uses the term "Client" rather than "Patient", although the two terms are interchangeable.
HOW TO GET THERE:
1) At the Main screen.
2) To add a new client, click the button located at top right of the screen labeled 'Add New Client' (see Client vs. Patient). If you are editing and existing client click on the button labeled 'Client Information'.
3) The Client Information screen similar to the one shown below, will be displayed. In this case, the screen below results from Adding a new Client/Patient.

INSTRUCTIONS:
As you can see from the screen displayed above, DELPHI32 has visually highlighted in red those items which must be completed before you are allowed to use the billing features of the software. This information is required because your claims will not be paid without it. As you complete each of the items in red, the red highlight on that topic will appear in a normal color. As you can see, the top of the screen states: "GET RID OF THE ITEMS IN RED!!!". These instructions deal only with those items in red.
One last important point is that although DELPHI32 requires all of the information in red to be completed, you may not know or care about any one particular item. For example: if you don't know or care what the referral source is, then simply select "N/A" for that option and the red will go away.
The items in red are covered below:
First Name - Enter the first name of the client.
Last Name - Enter the last name of the client.
Address 1 - Enter the address of the client. If their address requires 2 lines you may use the space labeled Address 2.
City - Enter the city of the client.
State - Enter the state of the client.
Zip Code - Enter the zip code of the client.
Sex - Click the drop down and select the sex of the client.
Referral Source - How did this client hear about you? If you don't know or care, select "N/A" from the drop down list. You may maintain the list of referral sources in the section labeled Referral Source Setup. Note: The referral source is different from the referring physician.
Procedure Code - Select the default procedure code from the drop down list that you will perform most often for the client. DELPHI32 comes with a list of procedure codes. You may maintain the list of procedure codes in the section labeled Procedure Codes Setup.
Provider - Select the default provider of service from the drop down list. You may maintain the list of providers in the section labeled Provider/User Setup.
Referring Physician - Enter the name of the physician that referred this client to you. If you don't know or care about the referring physician, select "N/A" from the drop down list. You may maintain the list of referring physicians in the section labeled Referring Physician Setup.
Place of Service - Enter the default place of service from the drop down list. DELPHI32 comes with a list of places of service. You may maintain the list of Places of service in the section labeled Place of Service Setup.
Diagnosis 1 - Enter the primary diagnosis for this client. DELPHI32 comes with a list of diagnosis codes. You may maintain the list of Diagnosis Codes in the section labeled Diagnosis Code Setup.
If you have provided all of the above information, you have successfully added a new client to DELPHI32. Remember that if you don't care about any particular item, tell the program you don't care by selecting "N/A".
The last step in quickly setting up a client is to specify if the client is covered by insurance. Locate the checkbox in the middle part of the client information screen (just above the medical information) labeled "Check for Insurance Coverage". If you check this box, DELPHI32 will display a new tab located at the top of the client information screen labeled "Insurance Coverage". Click on this tab and you should get the "INSURANCE INFORMATION" screen. Details on adding and editing insurance coverage is located in the section labeled Client Insurance Coverage.
| Browser Based Help. Published by chm2web software. |