Advances
OVERVIEW
Before reading about advances, be sure you already understand Open Item Accounting, have read the Payments Overview section, and understand the basic process for applying client and insurance payments.
Advances are used when you receive a payment and any of the following occur:
The amount of the payment for a session is greater than the remaining balance of that session.
You don't yet know which session(s) to apply the payment against.
The patient pays you an amount (retainer) that will cover future sessions not yet recorded.
Since DELPHI32 is an open item accounting system in which payments are applied against specific individual sessions, there may be times when you would like to hold any extra money you receive and apply it later to future sessions or possibly refund it. An advance is simply a temporary holding area for payments received before you know where they should be applied. (Open Item Accounting)
An advance is always the result of making a payment. This means that you will always be in the Payments screen when dealing with anything related to advances.
The instructions below assume that we are in the process of making a Payment and would like to apply all or part of that payment to the 'ADVANCE.' Once you understand how to apply money against an advance, you will later learn how to use the money in the advance to pay off sessions. This is described in the section labeled Applying Advances.
HOW TO GET THERE
1) At the Main screen.
2) Locate the client on the Main screen that you would like to make a payment for. In this example we will apply a portion of this payment against a session and the remainder against the Advance.
3) Click on the 'Payments' button located on the right side of the screen. A screen, similar to the one below, will be displayed.
INSTRUCTIONS
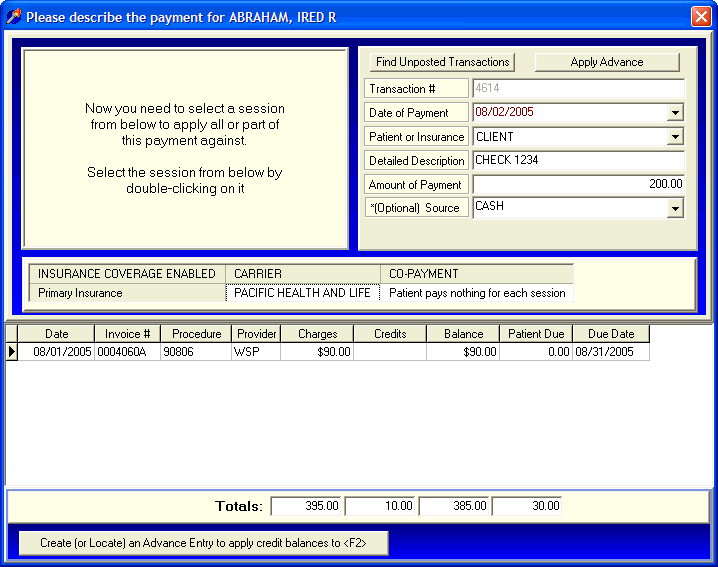
Recording a payment from the 'Payment' screen is a two-step process. First, you provide the details of the payment in the upper portion of the screen. Secondly, you apply that payment against one or more sessions located in the lower portion of the screen. In the example below, we are going to enter a $200 client payment that will pay off a session and then we'll apply the remaining money against the advance.
First, provide the following information.
Transaction # - This number is automatically assigned.
Date of Payment - Enter the date that you received this payment.
Patient or Insurance - Select 'CLIENT.'
Detailed Description - Provide a detailed description of this payment. This description will ultimately prove useful when printing Statements and viewing Financial Histories. Take a few seconds to provide a description that will be meaningful later.
Amount of Payment - Enter the total amount of the payment. In this example, we are entering $200.
*(Optional) Source - This is not required but may prove useful if you would like to further classify the sources of your payments and use that information in a report. The drop-down menu can be modified to include any payment source that you might find useful. Instructions for modifying this Payment Source list can be found in the section labeled Payment Source Setup.
Now the focus of the screen has shifted to the lower section where a list of the sessions for the client are located.
At this point, you need to double-click on the session that you would like to make the payment against. In this example, we are double-clicking on the first session and will display the "Apply Payment Screen" shown below.
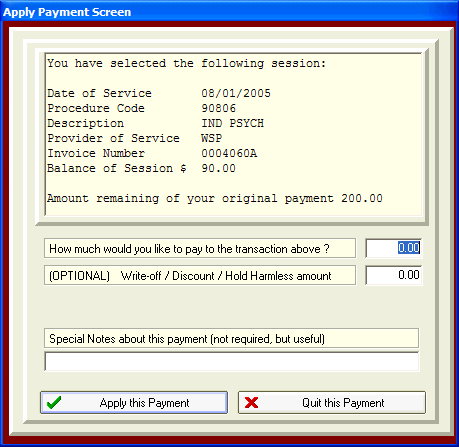
How much would you like to pay to the transaction above? - The first box is where you enter the portion of the of the total payment amount (entered in the upper screen) that you would like to apply against this session. In this example, we are going to enter $90 which is the total amount of the charge for this session.
(OPTIONAL) Write-Off / Discount / Hold Harmless amount - In this example, we will leave this at zero. If there is an adjustment amount on your explanation of benefits from the insurance company that amount would be listed here.
Special Notes about this payment (not required, but useful) - The last line allows you to enter special notes related to this specific payment against this session.
Since we started with a client payment of $200 and applied $90 against the first session, there will still be $110 remaining of the original payment. This is verified by looking at the upper section of the screen and shows the Amount of Payment of $110 as shown in the screen below;
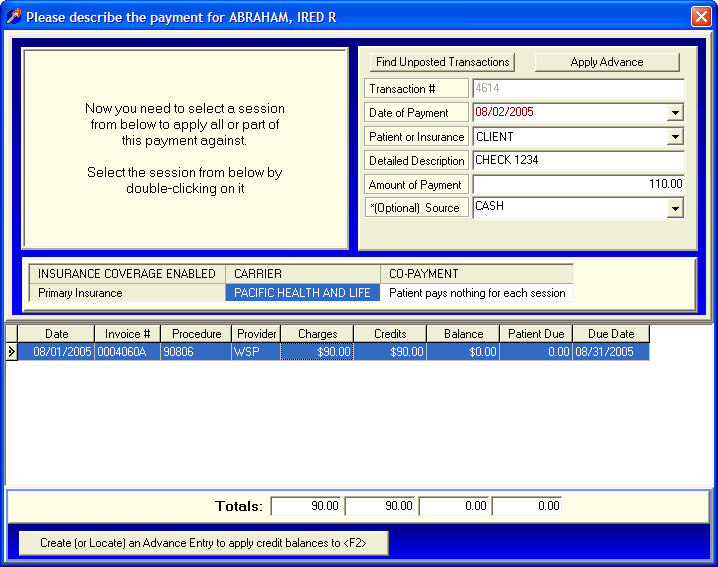
At this point, look at the bottom of the payments screen where there is a large button labeled ![]() .
.
Clicking on this button will create a new entry in the lower part of the payment screen called an ADVANCE as shown below. An advance is simply a temporary holding are for any extra money we receive that we do not want to apply to a particular session at this time.
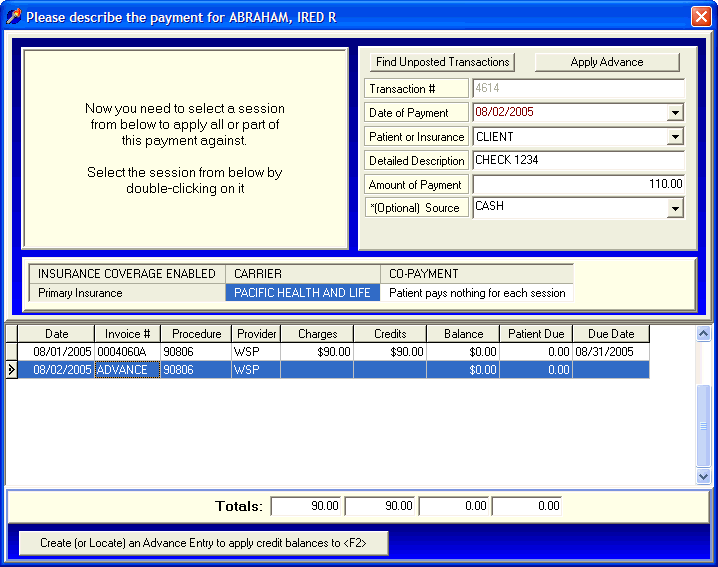
Double click on the entry called ADVANCE. This will display a screen similar to the one below.
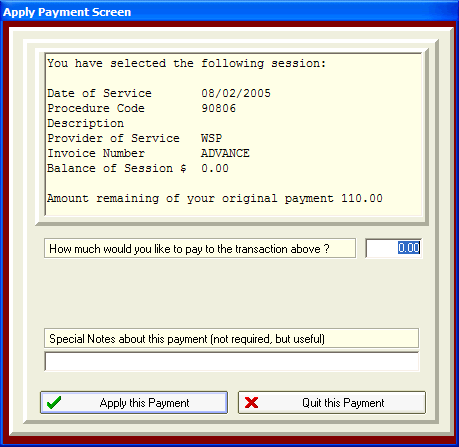
Since we have $110 remaining of the client payment, we will apply that amount to the advance. When finished, click on 'APPLY PAYMENT' and DELPHI32 will display the following message. 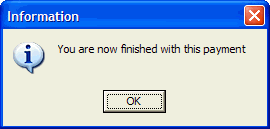
To summarize, DELPHI32 allows you to create a temporary holding area for payments (an ADVANCE) when the client pays too much or you do not yet know which sessions the payment should be paid against.
Now that you know how to apply money against an advance, you can later use that money to pay off future sessions, or possibly refund the money. This is called Applying Advances. Instructions for refunds can also be found in the section on refunds.