National Provider ID# and the New CMS-1500 Claim Form
OVERVIEW
These instructions are designed primarily for use by our existing customers. The goal is to allow you to place your National Provider ID into DELPHI, as well as provide instructions on the use of the new CMS-1500 insurance billing form. As most of you know, the CMS-1500 claim form is replacing the HCFA-1500 claim form.
We highly recommend that you print these instructions and follow the steps before calling us for help; this will help familiarize you with the basics of these new features. This document provides a brief overview of the specific steps required for the new forms. Don't forget that DELPHI contains an easy-to-use help system that allows you to press <F1> on your keyboard to receive detailed context-sensitive help on any part of the software. Lastly, if you are viewing this document on this website or from within the DELPHI software, you have the option of clicking on a hypertext link to that specific information.
This document breaks down into the following steps:
1. Download the latest version of DELPHI from www.delphipbs.com.
2. Enter your National Provider ID#.
3. Modify the claim form type in the Insurance Company Setup screen and possibly specify the use of the NPI ID #.
4. Edit existing individual Client Insurance Information screens to reflect the claim form type you desire.
5. Review the procedure for generating an individual claim form in the Session History screen.
6. Possibly change the printing alignment of the CMS-1500 claim form in the Printer/Technical setup screen.
7. Review the Insurance Queue for batch printing of claims.
Step 1
Download the latest version of DELPHI from our website: www.delphipbs.com.
NATIONAL PROVIDER ID #
Step 2
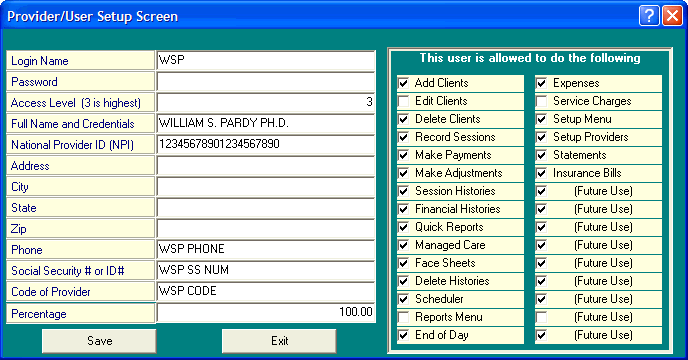
Placing your National Provider ID # (NPI) into DELPHI is the easy part. You can do this very quickly in the Provider of Service Setup screen located in the Setup menu. Once you are there, you can easily edit any provider and add their NPI number. The screen looks like the one shown below. The NPI # is located just below 'Full Name and Credentials.'
That's all you have to do to add your NPI. Now that you have the NPI correctly entered into DELPHI, we should configure DELPHI to use the new CMS-1500 claim forms.
CMS-1500 CLAIM FORM
The new CMS-1500 form will be required by most insurance companies over the course of the next few months. Most likely, you have already begun to receive notices from some insurance companies telling you that the new form is going into effect soon. We understand that there are deadlines for the use of the new CMS form, but in our 21 years of experience we have never seen all insurance carriers obey these deadlines at the same time and in the same manner. In a perfect world, all insurance companies would switch at the same time and make your life easier. If not, there will be a period when you might have some claims printing on CMS-1500 format while others may still print on the older HCFA format.
Step 3
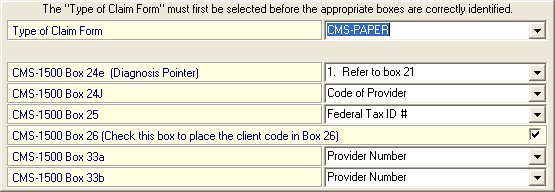
Go to Setup Insurance Carriers, highlight any insurance company, and click edit. If you select a CMS (Paper or Electronic) claim form, the boxes located in the lower part of the screen will appear as shown below:
If you select a HCFA (Paper or Electronic) claim form, then the screen will appear as shown below:
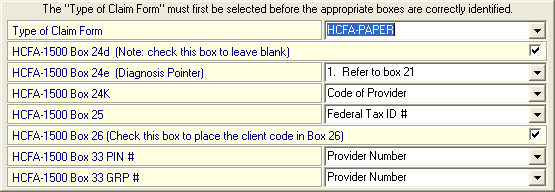
In either case, this screen gives you the ability to specifically select what you would like to appear in the various boxes on the claim form. Note that the box numbers that appear on a CMS form differ from those that appear on a HCFA form. Since the point of these instructions is to allow you to use the CMS-1500 form, we will concentrate on the first picture of the CMS form.
Among many changes to the form, two items require special attention.
First, look for the box labeled CMS-1500 Box 33a: On the CMS form, this box is for your NPI. You can click the drop-down menu for this item and select the term "National Provider ID." When printing claim forms, DELPHI will automatically retrieve the NPI from the provider of service setup screen and place the NPI located there on the claim form. DELPHI uses the provider of service for the first session printed on the form.
Second, look for the box labeled CMS-1500 Box 24j. This box used to be box 24k on the HCFA form. If you need to, you can click the drop-down menu and have DELPHI fill out this box with whatever information you desire.
The rest of the boxes provide similar choices that let you further customize your claims on a carrier-by-carrier basis.
Step 4
This step provides instructions for modifying the type of claim form for each client in the Client Insurance Information screen. Normally, that screen will look something like the one shown below.
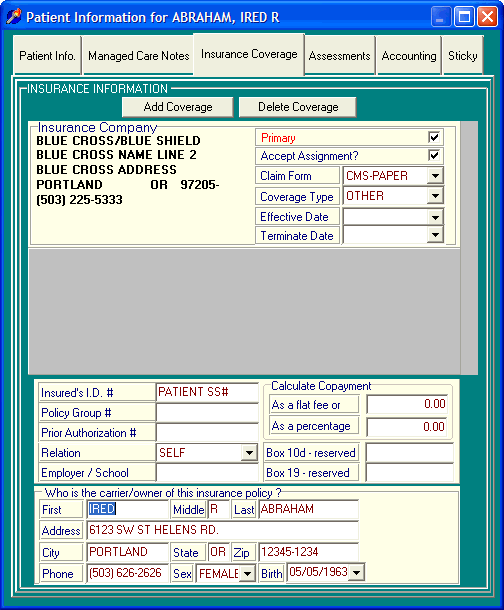
The main item to focus on is "Claim Form." Your choices are:
Step 5
If you have changed a client's claim form type to CMS-PAPER, then this is a good time to print out a copy to see how it works. This is done by going to the Session History screen for a client, selecting one or more sessions (up to six at a time), and printing a claim. Please note the following:
1. The alignment of the claim form is slightly different for the CMS form and may require fine-tuning. This is described in Step 6 below.
2. The preview option available in the Session History screen still displays a HCFA-1500 form, even though you might have selected a CMS-1500 for this client. The two forms differ only slightly, but you will still be able to confirm the placement of information. We will release a CMS preview within the next few months.
3. We have added a new feature for those of you with multiple printers. When printing claim forms, DELPHI will ask you which printer to send the print job to, if DELPHI detects multiple printers.
Step 6
Now that you have printed your first claim, odds are that the alignment of the print on the form could use some improvement. DELPHI allows you to adjust the printing down to the hundredth of an inch from the left side and top of the claim form.
To adjust the position of the print, go to the Printer/Technical Setup located in the setup menu. A screen similar to the one shown below will appear:
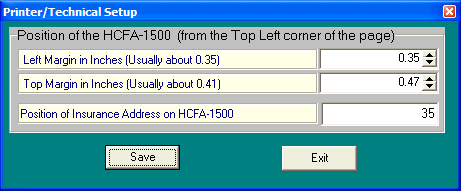
Use this screen to change the left and top margins of the claim form. In several tests here at our office, we had good results with a left margin of "0.32" and a top margin of "0.52." Your settings will probably differ slightly. Detailed descriptions for setting these values can be found in the Printer/Technical setup screen.
Warning: Some "Desk Jet" printers are limited by their paper feeding mechanism in how low on the page you are able to print. If you move the print too far down the page (in an attempt to get the upper parts of the form to print perfectly), then these printers might automatically feed the last line of the claim to the top of the next page. Obviously this won't work, and you will have to compromise by moving the print back up the page, one hundredth of an inch at a time, until your printer allows the complete form to appear on one page. Laser printers and Ink jet printers don't seem to have this problem. Note: the forms are pre-printed in red because they are scanned by the insurance carriers, and their scanners can't really see the red portions of the forms.
Step 7
Once you have had a chance to modify multiple claims to print on the new CMS forms, there exists the possibility that you will have a mix of claim form types. This section describes how to use the insurance queue to print batches of claims. If you don't know how to use the insurance queue, then you might want to read up on it before continuing. The insurance queue is located in the Reports menu at the top of your main screen. Once it loads, a screen similar to the one shown below will appear.
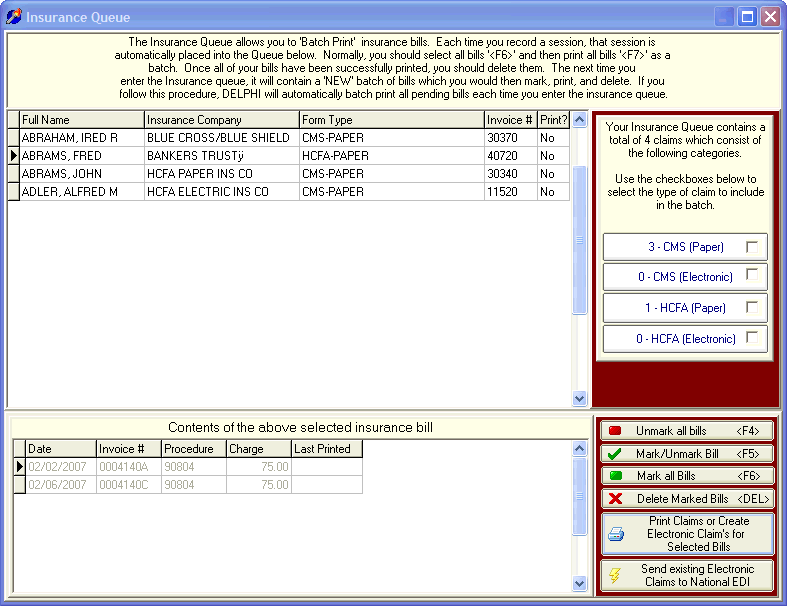
There are several new features in the Insurance Queue:
First, DELPHI will tally the total number of claims and break those down into their claim-form types. This information is displayed on the right side of the upper screen. Next to each claim type is a checkbox that allows you to select only those claim types. If you have a mix of claim types, you will have to mark one claim type, print it, and then mark the other claim type and print it separately.
Second, when selecting a claim type, DELPHI now colors that claim green. This is done by simply clicking an individual claim to select it, or clicking on it again to unselect it.
Third, if you attempt to print a batch of claims that consist of more than one type of claim form, DELPHI will give you an error message stating that "You have selected a combination of claim types," and not allow you to run the batch. You are only allowed to print a batch of type of claim form at a time.
Fourth, there is a very useful feature that allows you to sort your claims by any of the columns in the upper part of the screen. For example, if you want to sort your claims by insurance company (the second column), then you can simply click on the column header labeled "Insurance Company" and drag it to the left side of the screen. In this case, your claims would automatically be sorted by insurance company when printed.